Midjourney New “Zoom Out” Feature — Mind-Blowing Tricks!
Tell a Great Story and Create Professional Mockups with Zoom!
Midjourney V5.2 has recently been released, and it lives up to expectations!
The latest version introduces an exciting AI functionality known as “Zoom Out,” which gives users the ability to broaden the perspective of any image. However, there’s more to the power of zoom than just enlarging an image.
Today, I will share some advanced techniques to fully utilize the potential of the “Zoom Out” feature with customed prompts, particularly when it comes to crafting engaging stories and even creating impressive mockups!

Follow this quick start and prompts if you are new to Midjourney:
Let’s start with some basic usages.
What is “Zoom Out”?
The “Zoom Out” option allows you to expand the canvas of an upscaled image while keeping the original content intact.
How to use the zoom-out feature
1. Use the /imagine command to generate four images
2. Select one and apply an upscale
3. Below the image, you will find different options for “zooming out” which you can use to reframe the image

4. Select one and click it. Midjourney will enlarge the images according to your preference. Repeat the process to further expand your image as you desire.
Basic Zoom Out Options
- Zoom Out 1.5x & Zoom Out 2x
- Make Square
1. Zoom Out 1.5x & Zoom Out 2x
These two buttons shift the camera perspective and enhance details on all sides by 1.5 x and 2x.
Let’s take an image created with the latest “weird” command and observe the transformations through Zoom.


2. Make Square
With the “ Make Square” button, you can transform a non-square image into a square. When dealing with wide images (landscape), the expansion will occur vertically, whereas and vice versa.
Note that the “Make Square” button only displays below non-square upscaled images. It’s particularly handy when using Niji Mode because I occasionally forget to set the ratio to 1:1.

Potential Issue
Some of you may notice that continuously zooming out can occasionally result in a subtle darkening at the edges as it continuously expands the image’s surroundings.
They can sometimes become tedious and repetitive.

That’s when the Magic of “Custom Zoom” comes into play!
Alongside the usual zoom-out options, we can adjust the prompt and add contextual information that was not initially captured when zooming out using “Custom Zoom”.
Power of Custom Zoom
This exciting feature enables you to completely change the environment, offering a remarkable and immersive experience. Today, I will discuss four use cases that let you experience the power of Custom Zoom
- Add Context
- Composing Through Zoom
- Create Mockups
- Storytelling
Let’s go through this one by one with visual examples and inspiration
1. Adding Context
While utilizing the zoom-out feature, we have the ability to adjust the prompt to incorporate additional context that was absent in the original shot.
To modify the prompt, simply choose “Custom Zoom” from this menu, a text box will be popped up and allow you to modify your prompt.

Take this as an example:
Prompt: A portrait of a girl, looking in front, dressed in gorgeous attire and adorned with golden linen and red pearls, full body composition — ar 1:1 — niji 5 — s 180

In the sample above, we started with a portrait of a beautiful girl. Now, we want to give more context to the scene to add a story to it.

In front of a dragon

Introducing a distinct context illustrates diverse stories.

You can also customize the aspect ratio with custom zoom by adjusting the “ — ar” value in the prompt.
Below is an image zoomed out 2x with a 16:9 aspect ratio. The surrounding golden decorations transformed into the garments of the wolf and bear.

2. Composing With Zoom
By combining zoom-out functionality with variations, we can carefully manipulate an idea. Below is another example showcasing a bear game avatar in various settings.

Same Characters with Different Settings
With custom zoom, you can place the same character in different scenes.


Make Variations
Returning to the panel once more, we can utilize the “Create Variations” button to alter the minor aspects.

A subtle change will go a long way in controlling the feel of a composition! This is like a level-up of Mr. Bear.


3. Creating Mock-up
Start with creating an artwork, a logo or an illustration.

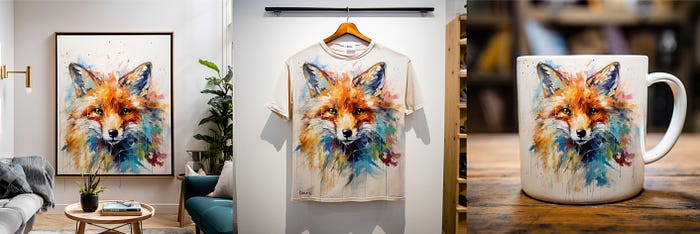
Utilize Custom Zoom out to generate a mockup by modifying the prompt “Framed wall art sitting in the middle of a cozy living room” and you’ll achieve an impressive mockup like this one.

Custom Prompt:
Left: Framed wall art sitting in the middle of a cozy living room
Middle: Printed on a white t-shirt hanging on the wall
Right: Printed on a mug sitting on a coffee table

Combining logos created with Midjourney together with the prompts for professional mockups or high-end product photography will work perfectly as well!
Try it on other mockups!
This is also beneficial and time-saving if you intend to sell print-on-demand products designed with Midjourney, like wall art or beautiful patterns.
4. Storytelling
Lastly, you can tell a great story by changing the context of the prompt.
Let’s cast some magic together!
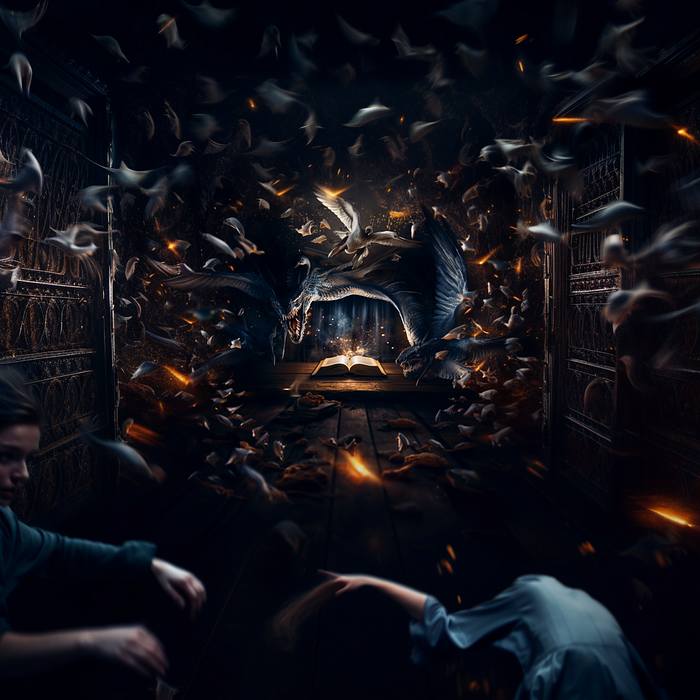
Prompt: A magical book placed on a vintage table, with beautiful light shining in, focus on the book, the book is opened

Let’s cast some magic. My hands look good, a bit weird but with five fingers each. That’s good enough!

Let’s call upon an eagle.

How about a dragon this time?

Some more birds?


Oh my goodness, things are getting crazy😱. The magical creatures are all coming out! That’s all for today, my friends.
I’m making a quick escape from the birds!
I hope you had a great time with today’s content.
See you and stay tuned!


Join me and thousands of other great writers on Medium. Read unlimited content and earn money with your writing. Start today!💫
I share tips, tricks and insights on AI tools for the design and creativity industries, focusing particularly on Midjourney. If you found this article valuable, make sure to:
🎨 Follow me and learn more about AI and Midjourney
💌 Subscribe and never miss a post!

