Usability testing for UX writing: A step-by-step guide

So you think your UX writing is good? Prove it.
I liked to think that I was writing in a clear way, and that I was only creating useful content that would guide customers to complete whatever action they wanted on our platform, be that making a booking or changing their password.
But I had no way to prove this, other than the fact that the customer support team rarely chased me up to flag any misunderstandings from users.
The quality of UX writing is tricky to measure — just because users aren’t making complaints to support agents, it doesn’t mean that they’re having a smooth user experience, with no misunderstood copy or other pain points.
Why usability testing is essential to UX writing
That’s where usability testing comes in. By interviewing real customers, you’ll find out:
- Do users accurately understand what you’re writing?
- What are users’ expectations of your copy? If a button says, “Check availability” under a hotel package, what does the user expect will happen after clicking that button?
- How are they finding the overall user journey? What’s delighting them? What’s not?
When you observe users reading your copy, you also get a front row seat to their emotional response. As UX writers, we always need to write based on the user’s emotional state — perhaps they are feeling anxious because they’re about to make a payment, and they need to know if their card details are secure.

Through testing, you can identify what UI strings are causing relief, satisfaction, frustration or confusion. Pain points uncovered along the way are valuable, too. A problem for the user is a problem for the business.
And once you’ve got the answers to these questions, you’re armed with the essential data to validate your work and find areas for improvement.
How to test your UX writing
Step 1: Decide research goals and tasks
When starting any research project, first decide on your research goals. What’s the purpose of these tests? What insights do you hope you gain that can help your business?
From there, you can create tasks for your users to complete based on those research goals. Let’s say your team’s priority is to increase sign-ups, then make a task based on the account-creation flow. Or if you want to test out a new purchasing flow and see how smoothly users can complete their purchase, if at all. Whatever your task, it should answer a key question that’s aligned with your business goals.
Once you’ve decided on your tasks, choose specific strings throughout the user journeys for testing. That way, you can ask users about the strings within the context of the user journey.
At Klook, we launched a flight ticket booking feature earlier this year. I noticed some UI strings I had written that, although approved by product managers, I wasn’t super confident about.
So I planned to get users to make a flight booking on Klook and ask them about potentially confusing UI strings.

You’ll want to ask these questions for UX copy:
- How do you understand this text? (“What does ‘Fees for checked baggage’ mean to you?”)
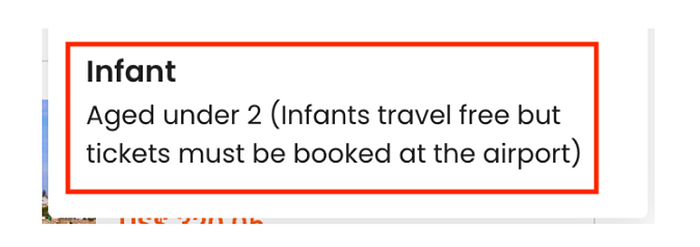
- How does this text make you feel? (“‘Infants travel free but tickets must be booked at the airport’ — How do you feel when you see this?”)
- When you see this text, what are your expectations? (“‘Get rewarded for exploring’ — What do you think will happen after you click this?”)
Try to avoid any leading questions and keep your inquiries neutral. Asking “Is this copy confusing?” or “Is this copy clear?” might nudge your user into an answer and tamper with your data as a result.
When creating your tasks, consider some scenarios that can lead your users to see the copy you want to test. For example, I asked users to book for a family with an infant, so that they’d see this copy:
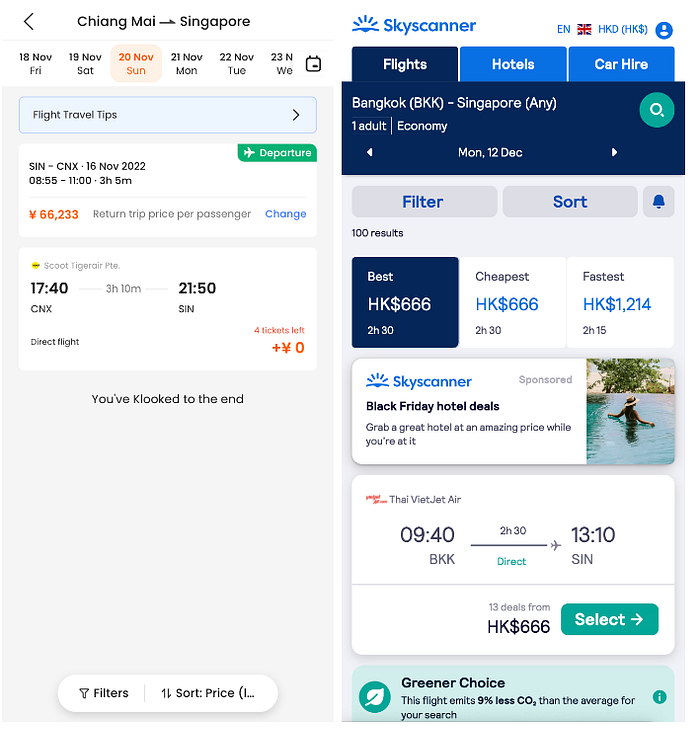
I also asked users to book a direct flight in the evening to see if they could easily spot the filter tool at the bottom of the page.
Step 2: Get a budget (or don’t)
First off, you don’t need a budget to do usability testing. Any idle colleagues will do. And you’d be surprised at the insights you can get from a fresh pair of eyes outside the product team. Colleagues are also great to practise with before you do the real thing.
But if your company is willing to invest in usability testing, get the budget confirmed. Having an incentive for users to take part in testing makes it a lot easier to find them. In your recruitment email, offer a $10 voucher to use on your product for completing a 30-minute testing session.
Step 3: Find your users
Now it’s time for your writing skills to shine: craft an engaging recruitment email and an information form for potential users to fill out and confirm their availability.
Email checklist
When writing your recruitment email, clearly state:
- What you’re testing for
- How the tests will take place (online or in-person)
- How much of their time you’ll need
- What they’ll get in return for their time
- When they need to respond by
- T&Cs about the session being recorded
Make your email look as official and professional as possible. You want potential testees to know that you’re legit!
Information form checklist
Attach an information form (a Google form works fine) and ask your users for their:
- Age
- Country of residence
- Availability
- Consent to take part in recorded tests
To target specific users and understand them better, ask for their usage habits regarding your product. For Klook, I asked whether the user had booked with us in the past 1 month, 6 or 12 months.
Reach out to your company’s marketing team. They should have a subscriber list to which you can blast your email.
Once you’ve sent the emails and the response deadline has passed, start picking your users for testing and propose a time based on their availability. It’s best to get a mix of backgrounds, ages and usage habits for more varied responses.
Keep in mind that not every user will get back to you, so when reaching out, it’s a good idea to include another deadline to ensure they reply in time.
Step 4: Run the tests
Now that you’ve arranged times with your users, it’s show time!
To make the environment feel as natural as possible, get your user feeling comfortable before you start the tasks. Open with an icebreaker, like telling them an interesting fact about yourself, or ask them about their plans for the day.
But don’t take up too much of their time, so get started and give them a quick rundown on the session. At this point, it’s worth telling your users that there’s no right or wrong way of doing things — you just want to see how they complete the tasks.
Have the tasks written down before you for quick referral, but don’t read from a script. Instead, ask your questions in a natural way. Like with making an ice breaker, this will make the user feel more at ease.
Once they’re ready, start recording (if you’re testing online, ask your user to share their screen). Instruct them on each task and remind the user to think aloud — this will give you a better idea of their emotional response and how they’re responding to your product. They should naturally read your copy aloud and tell you how they’re understanding things without you needing to prompt them.
As they complete the tasks, remember to ask questions about specific UI strings, but don’t be afraid to improvise when needed. If a user is focusing on some text that wasn’t part of your original plan, ask them about it.
At the end of each task, I ask users, “How was your overall experience doing this task?” and get them to elaborate. Here, they’ll usually tell me their feelings about the user experience and mention any pain points they encountered.
Step 5: Ask quantitative questions (if there’s time)
Earlier in this article, I mentioned that I try to write in a clear way and that I only want to write content that’s useful to the user. Along with being concise, these are the principles that I think about when writing for UI strings.
When the tasks were finished and time allowed, I asked each user to think about all of the text they saw and give a score out of ten in terms of clarity and usefulness.
And since I write for a product that aims for a strong brand voice, I asked users to give a score on how unique they felt the text was compared with similar apps; zero meaning “Completely generic” and ten meaning “Super unique”.
Think about the principles of your own UX writing and ask users to give scores based on these principles.
Although these scores won’t give you direct, actionable feedback, you’ll either have positive scores to show your bosses or know the areas for improvement moving forward.
Step 6: Collect & share your results
As a final step, collect all of your user feedback into one document. I created tabs for each user and listed out how they completed each task, how they responded to the selected UI strings for testing, and any other feedback they shared.
Once you’ve got all your data in one place, search for patterns and commonalities; these are your key takeaways that you’ll want to share with the relevant team.
For example, nearly all users I tested struggled to find the filters when searching for flights. When I asked why they didn’t use them, most told me they expected to see them at the top of the page, like on other competitors’ apps.
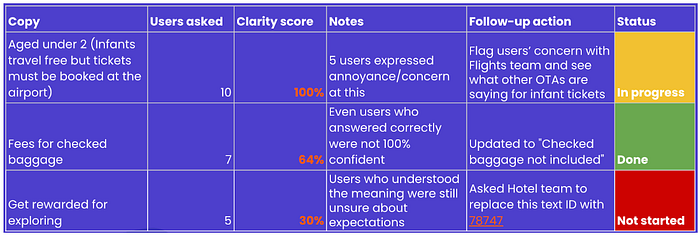
You can also create a table of all the UI strings you tested, with a clarity score based on whether users understood correctly, along with suggestions for follow-up actions.
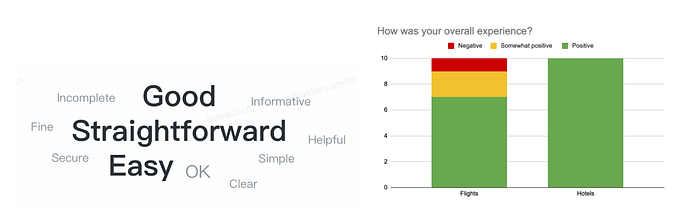
If you asked your users about their overall experience, list out the most common words used to describe their experience and create a chart showing whether their response was positive, negative, or somewhere in the middle.
Again, make sure that you’ve got a list of follow-up actions based on the feedback you’ve collected. That way, you can track improvements based on your results.
Finishing up
When you’ve finished your first round of testing and completed all the follow-up actions based on your results, you should have a better product with fewer pain points and clearer UI strings.
And as a UX writer, you’ll have copywriting that’s proven to be good.

