Case study: Life insurance app

This is a case study that I wrote based on our project for the challenge by Bank Jago. The project is a team-based project given from taking part in training at Skilvul in collaboration with Digital Talent Scholarship program by the Ministry of Communication and Information of the Republic of Indonesia.
Disclaimer: This project is part of the UI/UX Training Program held by the Ministry of Communication and Information with Skilvul and Bank Jago as Challenge Partners. I am not employed or bound in a professional contract by Bank Jago.
Project overview
The main objective of the project is to design the UI/UX of any products or features related to life insurance. Bank Jago gave us the freedom to design anything as long as it is related to life insurance. We are required to be as creative and innovative as possible.
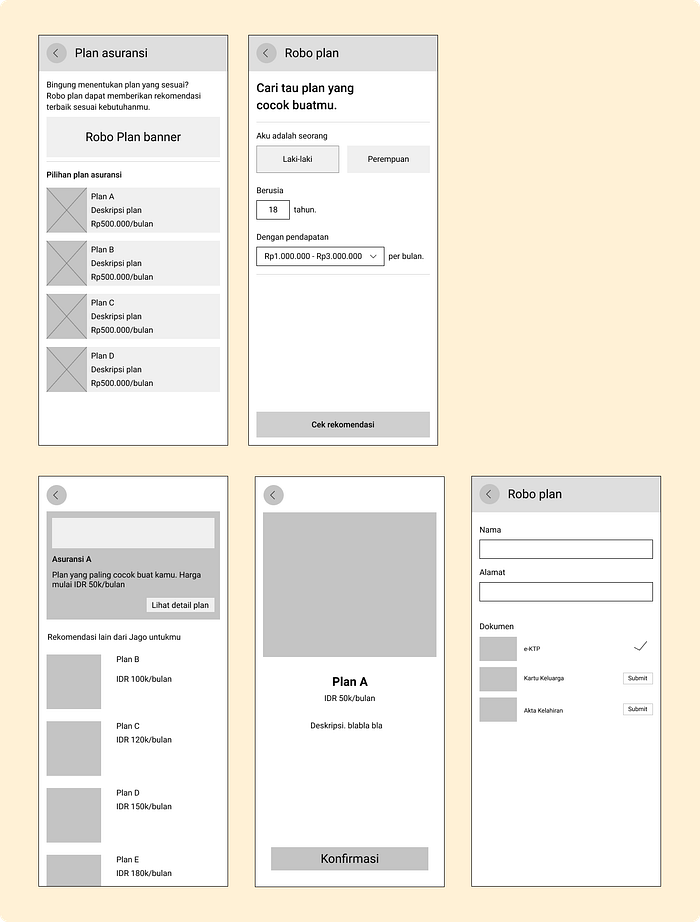
In this project, we decided to design a feature called Robo Plan, which is a feature that aims to help users find which life insurance plan suits their preferences and conditions.
The team
Our team consists of 3 UIUX Designers. Besides me, there are Bella Karina Arviyanti and Realino Marpaung. We all share the same responsibility in handling this project through all of its processes.
Design Process
We used Design Thinking as the framework of the design process in this project because Design Thinking is the focus of this Bootcamp. Here is the timeline for this project.

1 — Define
In the define phase, we had a fairly in-depth discussion about our thoughts on life insurance pain points.

Based on the pain points we got from our discussion, then we made How-Might We with the hope of finding solutions to the pain points found. After getting some insights from the How-Might We process, we grouped similar How-Might We’s, then conducted a vote to determine which How-Might We would proceed to the next design process.

After voting on How-Might We, we got 2 How-Might We groups with the most votes, namely [HMW make it easy, HMW make it fun, easy and less stressfull] and [HMW present more beneficial use of life insurance] which will proceed to the next design process.
2 — Ideate
Solution ideas, Affinity diagrams, & Prioritization ideas
At this phase, we did a brainstorming session to find solution ideas for How-Might We that have been defined in the previous phase. We got so many solution ideas by this time, so we need to narrow them down by grouping ideas based on their category. This process will also be very helpful in determining the priority of work.

Because there were so many solution ideas generated and the limited given time for doing this project, the next step was to determine the priority of working on solution ideas so we can focus on ideas that have the most value but have small effort to work on first.

As seen in the image above, the solution ideas that we will work on in this project are those included in the User-friendly, Insurance plan, and Payment groups since they have the largest value but with the lowest effort to work on.
Crazy 8
The next process we were working with is Crazy 8 so we can have a quick idea of how our product will look later on.

User flow
We created user flow so that it can be seen what flow the users will go through to achieve their goal. At this stage, we did a brainstorming session to think about how to make an effective and efficient user flow so the users can reach their goals easily.

We made the user flow quite short and straightforward in the hope of providing a good experience for the users to easily achieve their goals.
Wireframe
From the user flow that has been created, we proceed to create wireframes for all processes in the user flow.
3 — Prototyping
Design system
Before we got into the process of creating the user interface, we need to create a design system. The purpose of the design system is to maintain the design consistency of the product, the design system will also make it easier for designers to collaborate efficiently in the design process.


We start from basic things such as defining colors and typography for products that match the brand. Then proceed to create basic components such as buttons and input fields with their respective variants. The design system will continue to grow along with the user interface design process.
User Interface Design
We proceed to the process of creating the user interfaces. The following is a display of the user interface that we have created based on the wireframes.

Prototype
After finishing the user interface design, the next step is to make a prototype so that the design can be tested.
4 — Testing
The next thing to do is to test the prototype on the user. The process is done to validate whether the design that has been made can be a solution to the pain points that we had defined at the early stage. In this phase, we conducted a user interview with a respondent to find out her experience with insurance, then proceed with usability testing to validate the design solutions we have created.
Research scenario
- Introduction
- Project description
- User interview
- Usability testing
- Post-test question
User interview

User criteria:
- Male/female
- 25 - 35 years old
- Knows about insurance and finance
- Tech-savvy
Usability testing

User persona

Research findings
From our research and testing activities, we found that:
- In the first trial of usability testing, users tend to directly choose a life insurance plan instead of using the Robo Plan feature. This happened due to our lack of experience so that we forgot to give a clear brief of the test scenario.
Lesson learned: Pay more attention when creating test scenarios, make the brief as clear as possible. - The user finds out that it’s too easy to buy a life insurance plan using the proposed design solution.
- Need to add a few more parameters (ex: insurance goals and benefits) to be input into the Robo Plan so that the recommendation generated can be more specific to the user's preferences.
- Need to add some more information on the life insurance plan card to make it easier for the user to decide her desired plan.
- To improve credibility, need to add a link that will direct the user to a page that provides in-depth information about the life insurance plan she is going to buy.
Usability metrics
To measure if our proposed design is the ideal solution, we asked one last question to our user using a usability metric, Single Ease Question (SEQ).

The user gave 7 for the SEQ score because she felt that the process of finding a life insurance plan that matches her references and buying it is so simple and easy to understand.
Conclusion
We managed to create the design for the Robo Plan feature which aims to be the solution for users who are confused to choose which life insurance plan will suit their preferences. In addition, we also made the life insurance transaction process as simple as possible. After testing, the user gave a SEQ score of 7 which is the perfect number for the ease of use of the product.
The project is quite challenging since life insurance is a completely new thing for us. But we enjoyed our time in completing this project. So many new UI/UX design and life insurance-related things were learned, which is good for us.
Recommendation
A few things need to be done first before we can move on to the next stage. These things are like completing revisions according to the feedback we got during the testing session with users. When designing something related to finance, we should include as much detailed information as possible so that it can help users in the decision-making process.
What was done in this case study is the first MVP of the Jago Last Wish application. After finishing with this MVP, we can continue to work on the next MVP to complete.
Here we are at the end of this case study. Thanks for reading up to this point. Hopefully, this case study can be useful for all of us, especially for me in making myself a better UI UX designer. Feel free to drop your feedback, I will be very happy and appreciate it 😁
To see more of my design, please visit my personal website. I also actively showcased my UI design exploration on Instagram and Dribbble. Feel free to reach me on my email: jauhari.jp@gmail.com, social media, or Linkedin.
Thank you. See you on my other stories 👋


