Turn Midjourny Images to Vectors with this Free AI Tool!
Creating easily editable and resizable vector images, ideal for diverse design projects, print, and web graphics.
Midjourney simplifies the process of generating visually captivating visuals effortlessly. By inputting specific commands and a descriptive prompt, you can swiftly produce an array of remarkable image variations.
Nevertheless, Midjourney currently lacks the capability to generate vector images even if you include “vector art” in your prompt, as the default image format is jpg.
Today, I am going to introduce you to an AI tool to turn your image into vector art.

Join me and thousands of other great writers on Medium. Read unlimited content and earn money with your writing. Start today!
If you are new to Midjourney, follow this quick start and prompts to start:
What is Vector Image?
Vector images that are scalable geometric shapes used for print and web graphics. They maintain quality regardless of size and are essential for printing methods like laser engraving, vinyl cutting, and screen printing.
They are editable in vector editors, unlike bitmaps which are pixel-based and challenging to modify.
Vectorizer AI
With Vectorizer AI, you can now turn any images to vectors that are scalable geometric shapes used for print and web graphics. Vectorizer is capable to trace pixels to vectors in full color.
And you can take your images to editing tools like Adobe Illustrator to edit layers, and colors to enhance your design.
You can even recolor your image with the latest generative AI feature!
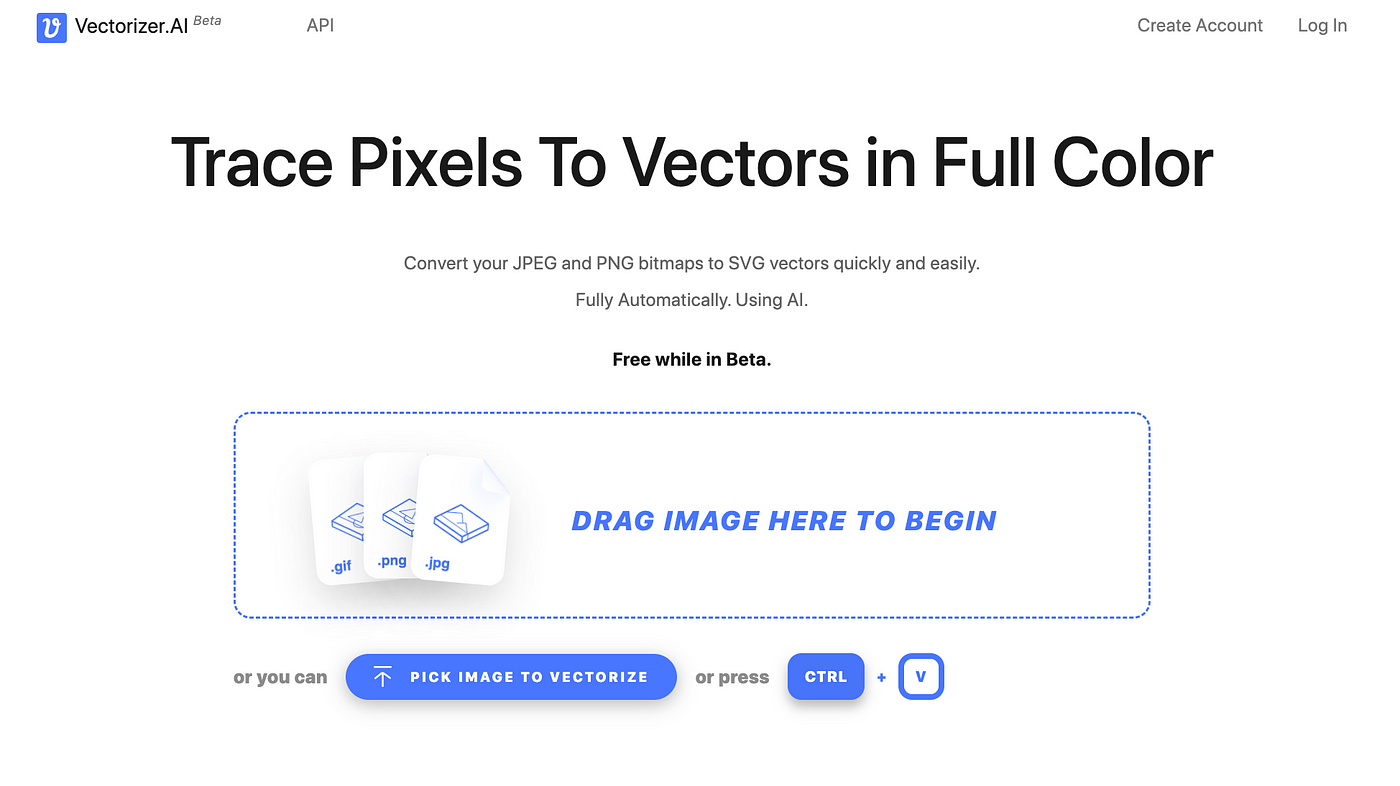

Vectorizer is completely free to use currently in its beta stage!
The vector image obtained can be resized to any resolution without losing clarity, and it is suitable for various applications such as printing, cutting, embroidering, and more!
How To Use Vectorizer?
All you need to do is upload your image created with Midjourney and select the format and style you need.

File Format
Vectorizer supports a variety of input and export file formats
- Input: JPEG, PNG, WEBP, BMP and GIF
- Output: SVG, PDF, EPS, DXF, and PNG
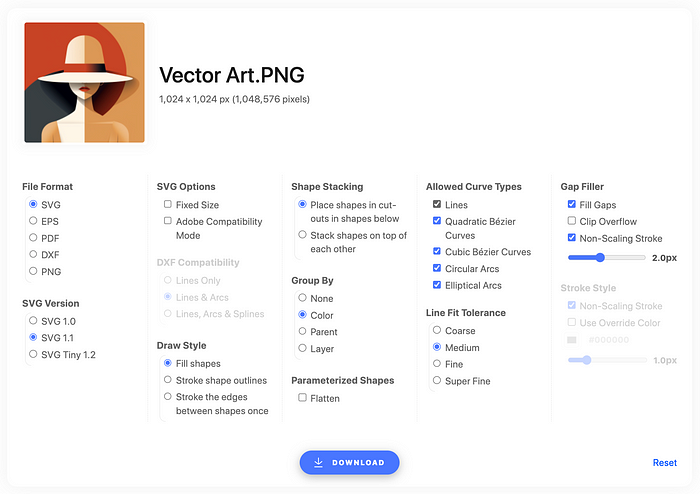
STYLES AND OPTIONS
Vectorizer provides a list of styles and options for you to choose from. I will give you a brief explanation of each of these and an optional trick at the end.
1. Draw Style
The vectorization process creates shape-defining paths. Filling shapes with respective colors maintains image appearance, sharpness, and scalability. Stroke options are available for applications focusing on paths.
- Fill Shapes
Color the shapes using their respective colors. - Stroke Shapes
Apply the stroke style defined by the Stroke Style to all the curves of the shape, mimicking the filling process but with distinct drawing characteristics instead of the implicit fill style. - Stroke Edges
Unlike Stroke Shapes, which double-strokes each edge, this Draw Style strokes edges between shapes only once.
2. Shape Stacking
Shapes in a vector image can be stacked or cut out of each other.
- Cut-outs
Shapes fit into cut-outs of shapes below, forming a single layer. It simplifies gap filler placement but requires more strokes. - Stacked
Shapes are placed on top of each other, minimizing file size and gap filler strokes. It complicates gap filler placement but can be resolved with non-scaling strokes.
3. Group By
Shapes can be grouped based on:
- Color
In Cut-outs mode, shapes of the same color form a single group. In Stacked mode, shapes of the same color in the same layer are grouped together. - Parent
When a shape is completely enclosed by another shape, the outer shape is designated as the parent of the inner shape. - Layer
Layers in the draw order consist of shapes that can be rearranged without affecting the image’s visual presentation.
4. Parameterized Shapes
Shapes with parameters, such as circles, ellipses, rectangles, triangles, and stars, can be identified and manipulated. Vectorizer ensures accurate geometry and corner treatment by fitting these common shapes.
5. Allowed Curve Types
They provide precise control over the exported curve types, considering restrictions imposed by file formats and other options. The most stringent limitations are consistently enforced.
- Quadratic Bézier Curves
Quadratic Bézier Curves have two endpoints and a single control point. The curve’s tangent at an endpoint aligns with the line connecting it to the control point. - Cubic Bézier Curves Supported by all formats, Cubic Bézier Curves have two endpoints and two control points. The curve’s tangent at an endpoint aligns with the line connecting it to its corresponding control point.
- Circular Arcs
Circular Arcs have a center, radius, start angle, and sweep angle. - Elliptical Arcs
Elliptical Arcs have a center, major and minor axes, rotation angle, start angle, and sweep angle.
6. Line Fit Tolerance
It offers control over the quality of the fit from coarse ( 0.3px ) to super fine ( 0.01px )
7. Gap Filler
- Fill Gaps
Enable gap filling. - Clip Overflow
Clip Gap Filler strokes to prevent overflow behind shapes. In Stacked mode, interleaving with draw order layers can cause them to extend beyond the intended shapes. Address this by clipping overflow or using non-scaling strokes. - Non-Scaling Strokes
It solves the issue of strokes extending beyond intended shapes. - Stroke Width
Gap Filler strokes have a recommended stroke width of 1.5px to 2px for complete gap coverage.
Experience the flexibility of Vectorizer as you create vector images that can be effortlessly re-edited and resized for various design projects, providing endless possibilities for print and web graphics.
Optional Trick: Create Your Image With A Plain Background
If you want to edit and place your vector on other images, you can create artwork with a plain-colored, minimalistic background so it will be easier for you to edit and place your vector on other images.
Add one of these keywords in conjunction with your prompt. That way, the process will be simple for you.
- white background
- plain background
- solid < color > background
Adding words like flat design and vector art also helps.
Depending on the usage of your graphic, this is not a necessary step.
Here is another article on achieving transparency with Midjourney
Join me and thousands of other great writers on Medium. Read unlimited content and earn money with your writing. Start today!
I write about tips, tricks and tools of AI tools especially Midjourney that will elevate your work! If you find this article helpful and would like to support me, make sure to:
- 👏🏻 Clap for the story to help this article be featured
- ✨ Follow me on this journey

