Our journey into foundational research
Written by Chandler Heath and Lauryne Ashby.
The role of UX research in the product lifecycle is absolutely invaluable. For teams just starting their exploration processes, a foundational research project is a great way to form a product strategy and gain a deeper understanding into users’ expectations.
The following learnings come from the research journey we undertook here at Modica Group. We’re an enterprise messaging company based in New Zealand that provides worldwide communication solutions.
As a team, our overall intention for this project was to better understand our existing userbase and how they use our toolsets.
In this case study we’ll recap the steps we took in our own research process and highlight some ways in which you can apply this to your own product.
Overview
There are four main components when conducting foundational research: Planning, recruiting, interviewing and analysing.

Before we dive into the process, let’s see if a foundational research undertaking is right for your product. This type of research differs from typical validative user testing and instead focuses on the overall state of your user experience.
If you’re part of a start-up, there’s likely not enough to discover here — this type of research is better suited for an established user base.
What advantages does foundational research provide?
- Greater knowledge of your users’ mental models and their use of your product.
- Understanding of the reasoning behind why users prefer your product and their decision-making process.
- Discovery of value and benefits the platform provides to your users.
- Increased understanding of problems and opportunities to be addressed.
Through this process you will discover the underlying motivations of why users chose your product and how it provides value in solving their needs. This forms a picture of who your users are and what wants and needs they have.
Conducting this type of research can be highly beneficial in the right circumstances. The project can be time-consuming but the insights gained are truly worthwhile and will contribute to the UX maturity of your organisation.
Plan
The first step to any research is planning! Firstly the objectives for your research project should be established, followed by carefully crafted questions to ask users during the interview process.

Potential research goals
- Establishing a team product strategy for the upcoming year.
- Discovering opportunities to address users’ pain points.
- Understanding market trends and acquisition strategies.
Once you have these goals in place you’ll want to start preparing the outline for your interview questions. The exact questions don’t have to be finalised at this stage, but these concepts will in turn be used to form a discussion guide — more on that later.
These questions should ideally be kept broad to allow for a wide range of discovery possibilities. Don’t focus on a particular flow or aspect of your product, but rather aim to cast a wide net across the entire user experience.
Example interview questions
- What tasks do you complete using our product? What is your workflow like?
- How have your needs for the product changed over time?
- How did you learn to operate the product?
- Have you faced any blockers while trying to complete tasks?
Your objectives and questions will be very much based on your own situation. Assess the state of your product and find out what you want to learn, then customise your research plan to serve these needs.
You’ll also need to decide on the number of participants for the study. We chose to interview 12 organisations. For a typical usability test we would opt for five to eight candidates with an emphasis on more frequent rounds of testing. That wasn’t an option for this research project, and so we decided to increase participants and focus on one round.
Compensation
Participation incentives should also be prepared. After all, your users deserve to be compensated for their valuable time and input.
There are many suitable options for this — we decided to provide vouchers. Determine a set hourly rate for your participants’ time, then once you know how many people you intend to interview you can prepare your budget accordingly.
If you choose to send vouchers as well: we found that to help save manual distribution efforts, services such as Tremendous and Tango Card make for fast, easy and automated delivery of e-gift cards.
Recruit
Once the logistics of the research project have been determined, participant recruitment begins. This stage can be the most time-consuming of the entire study, as we learnt.

A list of contacts should be gathered matching participant requirements for the study.
Example participant requirements
- Specific demographics: country of residence, age range, etc.
- Product usage: experience with certain features.
- Account type: administrator, manager, basic user, etc.
For our research we wanted to speak to both decision-makers and end-users in an organisation — the people involved in purchasing our solution, and those spending time in the interface. If this was the same person, great! If not, we split the interview into two smaller sessions. This approach may or may not work for your situation. Make sure to target the subsections of your user base that will be most important to talk to.
How you get in touch with your users will depend on the information you have on hand. Our primary methods of contact were mobile and email — this was an eye-opening experience in more ways than one.
We found that prospective participants regularly answered phone calls, so we could quickly determine if they were interested. To guarantee legitimacy and trust with participants, Account Managers were available to reassure it wasn’t a scam call.
Initiating contact via email felt less intrusive, respondents could get in touch at their convenience if they desired to participate.
Both methods had their downsides though — we found that not all emails were responded to, and likewise some calls were not answered or acknowledged.
What we learnt for recruitment
- A recruitment script is helpful for guiding the conversation and ensuring you cover all speaking points.
- Be upfront right away with the intent of contact, and lead with participant compensation as an incentive.
- Make it clear how valuable the contact’s input is — people tend to enjoy helping out when they know their time will help shape the product.
- Contacts appreciated being told that their information and feedback would be kept private.
- Explore different methods of gauging interest, such as email surveys or product-based opt-in.
- Make use of interview scheduling software such as Calendly to reduce back-and-forth conversations.
- Prepare an answer script for common questions or concerns.
- Involve other teams such as sales & service delivery and leverage their knowledge working with customers.
Interview
Now that your participants have been chosen and scheduled, the interview process begins! This is where a discussion guide becomes useful.

What is a discussion guide?
A discussion guide is a script used to guide the conversation of the interview. It provides direction and ensures all research subjects are covered.
The discussion guide should aim to cover all the questions you defined in the planning stage. Once you’ve written your guide, be sure to “battle-test” it with a colleague to ensure any issues are addressed ahead of the real interviews.
Your guide should serve as exactly that: a guide, not a concrete set of questions. It’s important to actively listen to the participant and ask discerning follow-up questions as you may discover underlying pain points that could contribute to your research goals.
For example, if they mention the onboarding process was difficult, ask them to elaborate on what made it difficult for them.
Don’t be afraid to go off-script — this might be where your most valuable insights come from. An effective empathetic practice worth looking into is the deep listening technique.
Interview logistics
Interviews can be hosted in person or online via video chat software. Given current social distancing guidelines, we opted for remote interviews over Google Meet.
In our experience we found a maximum of three team members attending to be appropriate — it is important to not overwhelm participants.
We ran the sessions with a nominated facilitator guiding the discussion, alongside up to two observers. Having observers ensured all key details were captured accurately and nothing was missed. During the wrap-up, the observers had a chance to ask additional questions that the facilitator may have missed.
Before asking any questions, it’s really important to gain the interviewee’s consent to participate as well as to potentially record the session. Having a video or audio record is helpful for if the observers miss any note-taking. Mention to the participant the purpose of recording and don’t be alarmed if they decline your request as they may have security or privacy concerns.
At the end of each interview, be sure to express your gratitude for their time, and confirm their details for sending compensation. The observers should ensure their notes are typed and formatted correctly, ready for the next phase: analysis.
Analyse
Now that you have collected all your information, it’s time to highlight important factors to be brought forward and discussed in the analysis workshop. It helps during these sessions to use collaborative software such as Miro or Figma.

Sorting all the notes
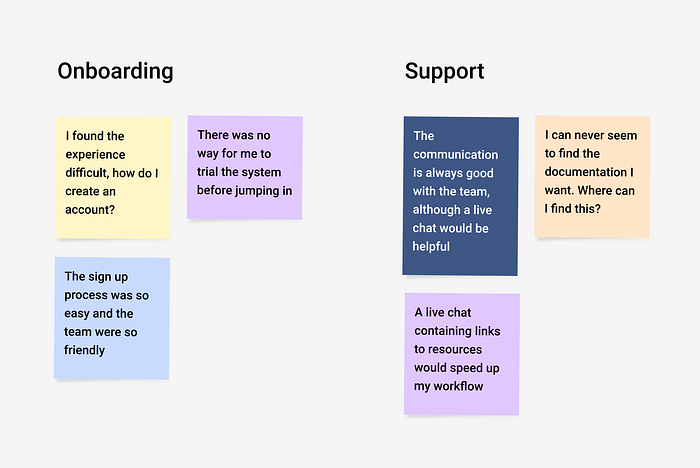
We started by highlighting all the key takeaways from the observational notes. These can be any statements mentioned by your participants that in some way align with your research goals.
We created a board in Miro and added a sticky note for every statement, colour-coded to the participant.
Our data set was massive, so we organised these notes using a process called Affinity Mapping, also known as collaborative sorting. This is the process of grouping data into related ideas in order to analyse for patterns and discover insights.
You may need to create several subcategories depending on your quantity of data. This can be a lot of work to organise everything, so try to collaborate with your team and share the workload!
Deep dive into data
After mapping all our information, we had a lot of idea sets to work with. We wanted to examine these groups further, and so we applied attribute analysis to our affinity maps — sorting by additional user demographics such as the their role (end-user or decision-maker) as well as their organisation’s size.
Analysing the mapped statements allowed us to look for common threads into our users’ experiences and seek problems and opportunities to solve.
From these learnings we then created an Opportunity Solution Tree. This is a visual aid used to link multiple ideation flows and their relation. We chose this method of analysis as a clear way to visualise all the outcomes of the study.
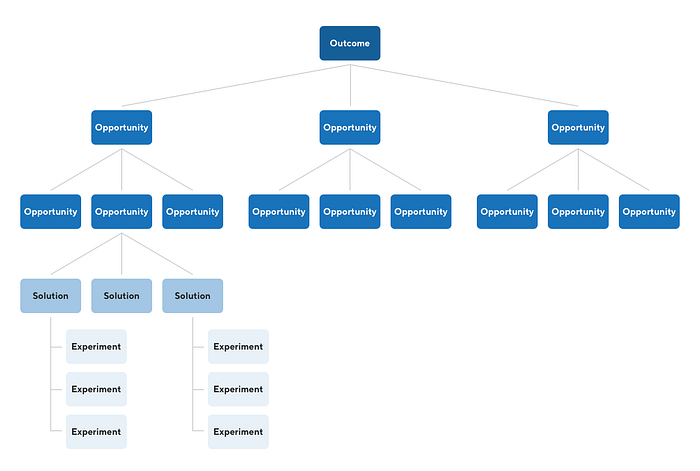
The opportunity solution tree was our final step towards forming our product strategy. Through this process we’ve discovered which areas of our product to focus on and we’ve learnt beneficial insights from our users.
Conclusion
This project was a great learning experience for us as a team undertaking foundational research for the first time. This research was incredibly helpful in understanding our users and their mental models as a vital step towards providing a great user experience.
Overall the feedback we gained was very positive, and we were able to reach a wide variety of user demographics. Of course there is always room for improvement so we’ll aim to refine this process for future research endeavours.
It’s also important to recognise that this process will not fit all scenarios. Design is diverse across teams and projects, and every designer has a different approach to their processes. Think of these learnings as additions to your design toolbox instead of a set list of procedures.
We hope sharing our journey has been helpful for you in shaping your own product strategy. If you enjoyed this post or have any questions, we’d love to hear your thoughts in the comments!
Illustrations thanks to undraw.co.

