Design Canary: An individual UX activity to solve more significant problems.

Every design team worldwide has unique design processes and methodologies to make their product shine and solve users’ problems. Every designer in the design team follows the same methodology that their team follows in their day-to-day design activities.
However, how does the design team or an individual UX designer respond when they are faced with a complex UX problem that needs to be solved in a short period? How do they design a new feature with more complexity?
What do I mean by complex?
Well, let me answer that before diving in. In 2015, I joined a startup as a UX designer with 1.5 years of experience. The company had about 120+ employees and was a great environment with fantastic people to work with.
After a month of learning about their design process and products during my practicum, I was assigned to work on a new product that seemed like an easy task at first. However, I soon realized that I would need to design 40+ screens for 4 different user groups and that the product’s appearance and behavior would depend on the user type.
The good news is that another UX designer was added to my team, but he was a fresher who had to be trained accordingly. All the senior designers were busy working on other projects for outside clients, so I couldn’t seek their help. I was instructed to complete two wireframes per day and present them at the end of the day. So, we started working together by analyzing the product and designing it.

It could have been better!!!
Can you please try this or try that?
You missed it.
Why did you do this?
Are there any alternatives?
These are the questions we kept getting. After six to seven iterations, we completed two wireframes. There was no celebration as we still had more to complete.
As an entry-level designer, it was quite complex for me to provide the best possible solution to solve the problem. Many entry-level and mid-level designers face this kind of situation in their day-to-day design activities. Don’t you agree?
I began by first thinking of a solution for this problem before finding a solution for the project we were working on. I created a kind of design sprint to follow in that project. After following that, we were successful with one or two iterations.
Started thinking of naming it and following that concept in all my design-related activities. I believe that this activity will help entry-level and mid-level designers to succeed with very few iterations of their regular design tasks, and it will also help them handle complex UX problems that arise.
Senior-level designers may have their way of handling this situation, but entry-level designers need assistance. Most design teams from larger tech companies involve entry-level designers in design sprints when a complex or critical UX problem arises. It enables them to learn faster. The design sprint is one of the most widespread collaborative activities that helps teams to solve complex UX problems and to create new features with more complexity that require a quick solution. Let’s see how this folds out.
Design Sprint
The sprint is a five-day process for answering critical business questions and solving complex UX issues through design, prototyping, and testing ideas with users. This group activity was developed at GV by Jake Knap and UX specialists at Google Ventures.
The design sprint has five phases: empathizing, ideating, deciding, prototyping, and testing. Each phase takes one whole day to complete.
If we have a complex UX challenge to solve, the team will follow a design sprint to find the best possible solution. This is derived by pooling many ideas from various team members during the activity.
The design sprint enables many organizations to solve their UX problems in three to four days, but not every time! Below are some criteria for when the design sprint should be considered:
- At the commencement of a new project to define your product or create a shared vision,
- When time is critical and you need to inject speed into your design or decision-making process,
- At an impasse, roadblock, or fork when your product or team needs to get unstuck,
- After uncovering new insights to leverage new findings, data, or research.
Scenarios where the design sprint may not be functional:
- When only an individual designer is stuck on a UX problem,
- When time is critical and you need to inject speed into an individual designer’s task,
- When a few team members are not available for the design sprint activity,
- When a support team needs quick UX fixes for their support tickets,
- When a moderate UX challenge arises that needs to be solved in a day or two.
In the above scenarios, the design sprint may not be fit, and organizing the activity can be time-consuming and complex. Getting participant availability can be more problematic when planning to conduct it, right? So how can an individual designer come up with the best possible solution for the problem? Design canary maybe?
What do I mean about canary?
Before diving in, what does “canary” mean? What are canaries known for? I believe that most of us are familiar with it, but let me give a brief overview.
The canary is a diminutive songbird from the finch household and is known for its singing ability. Unlike the finch, canaries can produce a sweet song even when they are caged alone.
Let us consider the design sprint as an endless cage (sprint venue) where every participant is a finch bird. Together, they can make sweet songs (UX solutions) for their owners (stakeholders) every morning. But if the finch bird is caged alone (trying to solve complex UX problems alone), it won’t sing like before. Instead, it will be stuck and forget the singing. In short, the finch bird does what others do as a group, and the canary knows what to do even when it is caged alone.
Adopting the characteristics of the canary bird will help every designer to solve UX problems in their day-to-day design activity. That’s the reason behind the name “Design Canary”.
Moreover, the humble canary was an important part of British mining history until 1986. The canaries in coal mines detect carbon monoxide and other toxic gases before they hurt humans. The idea of using this bird was suggested by John Scott Haldane, known to some as “the father of oxygen therapy”.

Why was a canary Haldane’s suggested solution? Canaries, like other birds, are good early detectors of carbon monoxide and other poisonous gases than humans. It can live alone and be active even in challenging situations. That’s great, right? The cute little bird has a lot of mastery to inspire us.
Source: Smithsonian magazine and Forbes
The Design Canary
The ideology of the design canary is to help designers make better experiences. Let’s find out what a design canary is and how it can help entry-level and mid-level designers solve critical UX problems.

Design canary is an individual design activity or process with 8 phases that can be altered or reordered based on the project or task we work on. Below are the 8 possible phases of this activity:
- Understand/Learn
- Breaking down the Problem Statement
- Define Goal Statement
- Decide solution
- Create an Explanatory Wireframe
- Hi-Fi design
- Review & Test
- Iterate
Let’s break down each step to understand more about the design canary activity. You can add or remove steps and name them to make them easier to remember. For instance, you could call it Design Whale, Design Owl, or something else that stays solitary and does magic every day.
1. Understand or Learn to understand:
When a critical UX problem arises that needs to be solved, take a deep breath, think, and try to understand why the problem is happening by empathizing with the user.
If you can understand the problem, you’re ready to move on to the next step. If not, you can learn from your mentor about the problem. Don’t worry, after two to three practices, you should be able to sort it out.
2. Breaking down the Problem Statement
After gaining a clear understanding of the user’s problem, derive the problem statement and break it down into smaller parts to examine carefully. Breaking down the problem? Here’s an example:
A low-code platform has two types of users. #1 is a developer who can develop low-code apps and sell them directly to customers. And #2 are non-developers or users who want to create or obtain applications for their business with the help of low-code developers. If the platform does not provide a way to connect these two types of users, they might encounter the following problems:
Problem statement: Nathan Doe is a developer who uses the low-code platform to create apps, but he can’t find customers who need his applications. Maria Doe is a businesswoman who uses low-code applications, but she can’t get custom solutions for her business automation.
From the above example, we can break down the problem statement like this:
- Nathan Doe uses the low-code platform to build apps and wants to sell them globally.
- Nathan Doe can’t find customers who are looking for his applications.
- Maria Doe is a business owner who wants a low-code application for her business.
- Maria Doe needs low-code developers to help her create a custom application.
Here, you can get a clear picture of the problem statement. If needed, you can break it down into even smaller parts for more explicit understanding.
3. Define Goal Statement
Goal statements are descriptions of the end states that users want to reach. Importantly, user goals should refer to real-world end states. Use the problem statement to create a document outlining each goal you want to reach by providing a better solution. For example,
Goal 1: Allow users to communicate on the platform,
Goal 2: Provide a place to download & sell low-code applications,
Goal 3: Allow users to hire developers in the platform,
Goal 4: Provide a portfolio for developers to showcase their applications.
..and so on
If you are revamping or iterating an existing feature or an application, you can identify pain points in addition to goals.
4. Decide Solution
Decide which solution you want to choose from the numerous solutions obtained for the above problem statement. Wait, what? I haven’t located any solutions yet, so how can I pick one?

Yes, you got it already! The moment when you split your problem statement into tiny pieces and list the goal statements, you may have figured out the outline of the solution. Now you can list all your potential solutions and pick the best possible one to construct the wireframes.
For a basic understanding of how we can list the solutions, you can try listing all your ideas under the following categories:
Quick Solution:
List a few quick and very easy solutions for each problem from the problem statement. For instance,
Problem statement: Allow users to communicate.
1. Provide a phone number & email address to communicate.
2. Social media links in users' profiles.
and so on…
Sky-high Solution:
Fly the extra mile to provide a few complex or even crazy solutions for the problem statement. For example, for the above problem statement, the sky-high solutions are:
1. Allow users to connect their hologram projector.
2. Wearable glasses to make video and audio calls.
and so on…
Fair Solution:
A fair solution is a list of solutions from which you can choose the best possible solution to create wireframes. Below are a few fair solutions for the above-mentioned problem statement.
1. Text chat feature for users to communicate.
2. Provide communication features with chat, calls, and more actions.
If your target list is a fair solution from which you have to choose one, then why should you care about quick and sky-high solutions? The answer is that you can compare what is above and what is beneath with your choice of solution. It helps sharpen and improve one’s thinking ability.
Hologram technology is growing and its development began in 1962, at the University of Michigan. Many tech companies started prototyping devices, smart glasses, and more to achieve the outcome.
If we consider that a hologram projector becomes a built-in technology in computer devices in the future, the sky-high solution might be considered a fair solution for interactive communication, right? So don’t restrain your thinking.
5. Create an Explanatory Wireframe:
The wireframe is the most promising step where we try out the low-fi design with chosen solutions to solve the user problems. A design process won’t be complete without constructing a wireframe. Agree?
But what is an Explanatory Wireframe?
An explanatory wireframe is a wireframe with defined goals, pain points, and a solution to solve them. In a conventional wireframe, we will add a guide sheet for each page or for a group that contains our goals for the project, the pain points that may occur, and the adequate solutions we provide to solve them.
Creating an explanatory wireframe will illustrate why we are doing this and what we are trying to solve. You can accumulate a basic understanding of the explanatory wireframe from the below example.
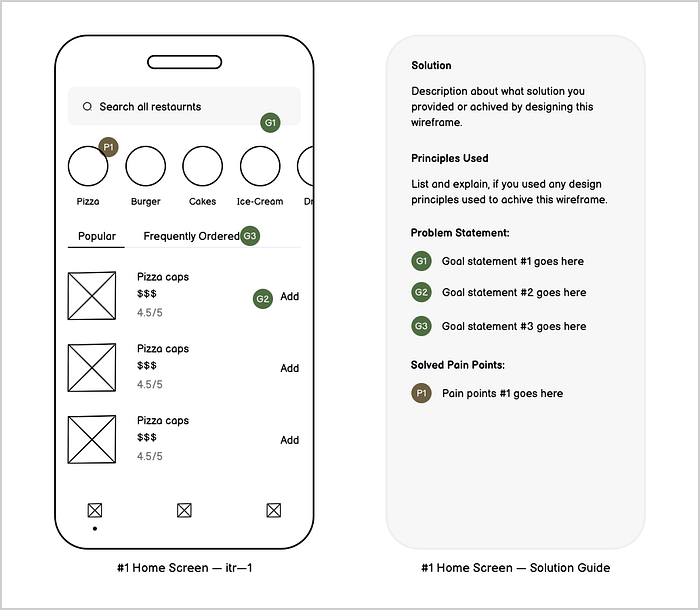
The above image may convey how the explanatory wireframe is created and I hope that you can understand the concept and its anatomy. I will prepare a separate post about the complete process of the “Explanatory Wireframe” with its pros and cons.
Once the wireframe is prepared, you can present it to your team to obtain feedback. Afterward, analyze the feedback and iterate on your wireframe again and again. If everyone is happy with the results, let’s freeze it and move to the next phase.
6. Hi-Fi design:
Congratulations, you did it! You are now ready to adopt your design system to give life to your wireframes. The hi-fi design phase always challenges one’s visual skills to handle colors, typography, patterns, and more. Following a universal design system may quicken and unify the process.
If you are creating a new product and no design system has been created, you can try multiple visual representations (options) of your product by using different colors, styles, and font variations. When you find a style that fits with your brand guidelines, you can start creating your design system concurrently.
7. Review & Test:
Create a working prototype from your finalized design using a tool to conduct a study or a usability test. In this phase, from an individual UX activity, we are not going to test our prototype with actual users. Instead, we can test with our teammates or a friend from another team who has a different role. This testing will provide insights into missing aspects and show additional ways to achieve the goal and complete the flow.
There are tons of user testing methods available to learn about the users’ behavior and usability. You can pick any of the methods that suit the timeline of your project. You can also try a group usability study with your fellow team members.
8. Iterate:
Feedback is always powerful. Doing n number of iterations will sculpt the output with perfection. Try to get feedback, analyze it, and then iterate multiple times until you address all user problems or feedback.
Conclusion:
That’s it! Are you now prepared to solve a complex UX problem? Can you manage a new feature individually? And will you follow the above steps? If you ask for my opinion, I would say that following the above steps is optional.
The design process is not a common thing in all tech companies around the world and may differ from team to team even in the same company. Therefore, I intensely suggest creating your own individual UX activity to solve a problem. Give it a name as you wish, and follow it. I hope this will help you to become a better UX designer and enhance your research skills.
You solved the problem by providing the best possible solution. You perfectly adopted your design system. You have proven that this prototype works fine by conducting the test. What’s next? Most entry-level designers are learning very fast and creating perfect designs every day. But most of the time, their designs don’t see the light of day. Have you faced this? If yes, improving the ability to effectively articulate design decisions is critical to the success of design tasks because the most articulate person usually wins.
I recommend the book “Articulate Design Decisions” by Tom Greever to learn a bit about how we can communicate our designs with non-designers and stakeholders in order to succeed.
Thank you for taking the time to read this post and for providing feedback that is greatly appreciated. It helps me continue growing and improving as a problem solver. Your input is valuable to me, and I am grateful for the opportunity to learn from it.
Thank you again ✌🏻.

