How to Properly Design Onboarding Screens

I n my opinion, I believe there are a lot of applications that are neglecting the importance of onboarding as a part of the application design. They sometimes consider it as a feature to be added when they have time. So, in this article, I will go in-depth about user onboarding. I will explain the user boarding definition, types of onboarding patterns and examples, and best practices of onboarding.
What’s onboarding?
The onboarding screens are the first things that the users see when they launch your application. It’s sometimes known as first user experience (FUX). It is usually used to demonstrate some facts about the application such as how to use it, the application features, and how the application can help the users. Even though a lot of applications have ignored onboarding, a lot of user studies have shown that the importance of user onboarding relies upon two things which are users activation and users retention. User activation means that the user understands the application’s main features and how to use them. User retention means that the user has enough motivation to go back and reuse the application again. Onboarding not only benefits the users but also benefits the business to make revenue since they have only one shot to impress the users.
Types of onboarding patterns:
There are three patterns for onboarding:
1- Annotated: pattern designed to point out a specific feature.
2- Embedded: pattern designed to alert or announce something.
3- Dedicated: pattern designed to make the users excited.
Examples of onboarding:
1- Product tour:
One of the popular onboarding out there. It can be very helpful to the new users to get to know how the product is used. However, when designed poorly, users will often skip it. The following picture demonstrates a product tour of PayPal. We can see that they provide the users with the option to end tour which is very important because some users are already familiar with PayPal.

2- Checklists:
Checklists can be better than the product tour for large products. However, keep in consideration that you need to be careful when designing a checklist for your product. The checklist needs to be listed as less than 10 steps, inform the user how long is left through a progress bar, and make sure that each step is small and clear. Here is a good example of a checklist designed by UserGuiding.

3- Interactive guides/walkthrough:
This type of onboarding is very similar to a product tour. However, they are interactive because, unlike product tours, they show the users how to take an action instead of telling them. Here is an example of this type of onboarding designed by UserGuiding.
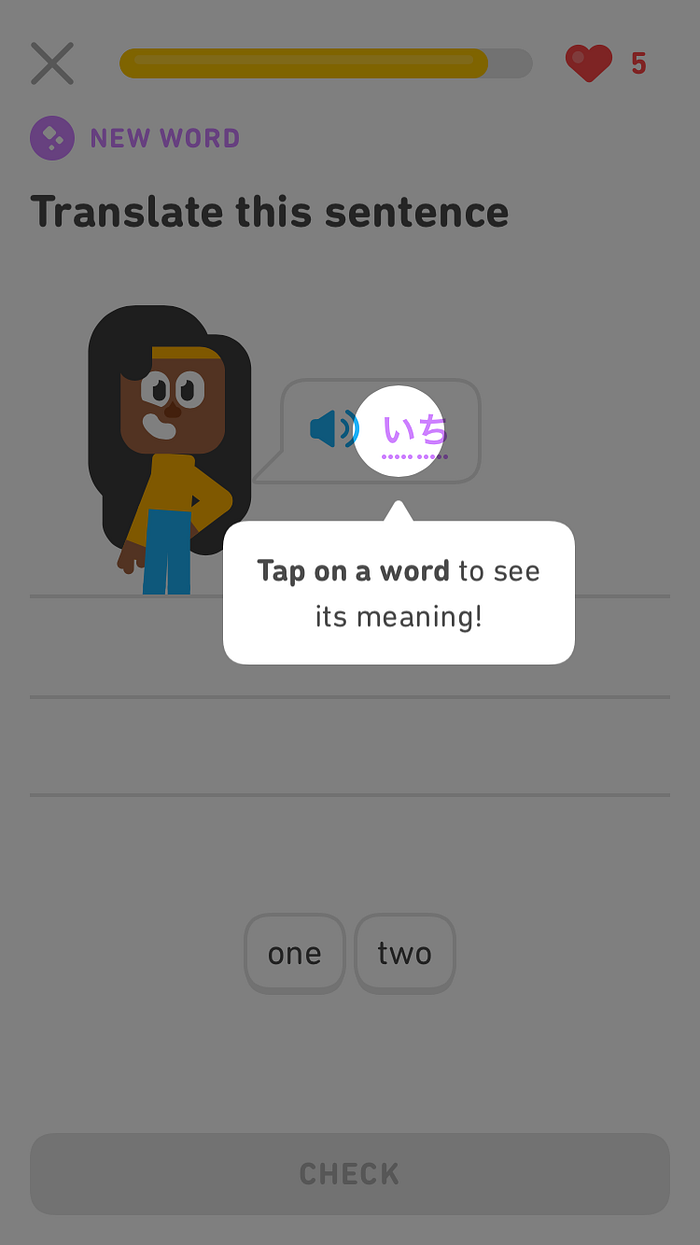
4-tooltips:
This is the type of onboarding is used to help users by displaying more information about the clicked element. It can be very useful for educational products more than the product tour. An example of that is what’s done by Duolingo which displays the meaning of the word when the user clicks it.
Best practices of onboarding:
1- Know who you are designing the onboarding for.
You will know more about the users of your application when you conduct user research. Make sure to carefully understand the user needs and outline these needs in your onboarding to make a good first impression.
2- Meet the expectations of the users.
There is no room for lies when it comes to onboarding. You can’t promise users that your application will help them with this feature when this feature is missing.
3- Make users involved in your onboarding.
Instead of only telling, show the users how to implement a certain action. Not only that will motivate the users to finish the onboarding but also it will reduce the user’s error rate since they have already learned how to do it.
4- Use simple language.
To connect with the users better, avoid using jargon that may not be understandable by everyone. The point of onboarding is to simplify the process of understanding the application’s main features so keep this in mind. Moreover, don’t only use written content, use other ways like pictures, illustrations, sounds, and videos to attract the users.
5- Show the users how much is left.
Whether by using a progress bar or navigation icons, make sure to let the users know how long is left before they can use your product.
6- Don’t overwhelm the users.
Too many steps in the onboarding are likely to be skipped especially if there were designed poorly. Make it short and sweet and display only the main features of your applications.
7- Give the user the option to skip the onboarding.
It won’t only show that you value your users’ time but also it’s necessary since some people are already familiar with your product and they want to use it immediately.
8- Be creative.
Implement the onboarding in a fun way to increase the users’ “wow” moments and to make the users more excited about your product. Showing your creativity will also make you stand out from your competitors.
Here is an onboarding I designed for a plant care application. I outlined how the application can help the users in taking care of their plants. Let me know in the comments what do you think.
Source: https://userguiding.com/blog/onboarding-ux-patterns/
Thank you for taking the time to read.
Don’t forget to follow me here on Medium in which I will be writing articles weekly.

