Generating videos using ChatGPT, Runway and WellSaid Labs
A quick way to get an instant SEO boost for your blog post articles is to add a video to it.
Here is a step-by-step guide on how you can create beautiful videos using ChatGPT Plus, Runway and WellSaid Labs — starting with the content of your blog post.

Disclaimer: This process is best for creatively challenged people like me who just can’t figure out what a full video narrative should be. It is NOT designed to replace expert video creators. However, a process like this could potentially be used to create 100% automated videos via API.
Requirements

- ChatGPT Plus (the $20 subscription)
- Runway
- WellSaid Labs
Step 1: Generate Video Script (Using ChatGPT)
First, generate the video script for the video.
Using ChatGPT GPT-4, use a prompt like this:
I have a blog post with this title: “<INSERT TITLE>”. The content of this blog post is delimit $$$
$$$
<INSERT CONTENT HERE>
$$$
Act like a professional videographer from the New York Times and suggest a video script that conveys emotions, provides context, and give viewers a clearer understanding of the above content. Please return ONLY the video script. Please use a maximum of 8 scenes with voiceover narration. No explanation is required. Please output delimit ###.
###
Video Script
###
This will give you a nice video script with multiple scenes like that shown below.

Step 2: Create the Video Clip (Using Runway)
Now that you have the scenes, create the video clips using Runway.
Select the “Start with Text” option and enter the scene description as given by ChatGPT. For example:
[Shots of ancient historical events, like the fall of the Roman Empire, digitally altered to show alternative outcomes]

This will give you a nice 4s video clip like this:
Step 3: Create the Audio in WellSaid Labs
Now that you have the video clip, you can generate the associated audio for it, using WellSaid Labs.
Paste the “Voiceover” for the scene from ChatGPT to generate the audio voiceover.
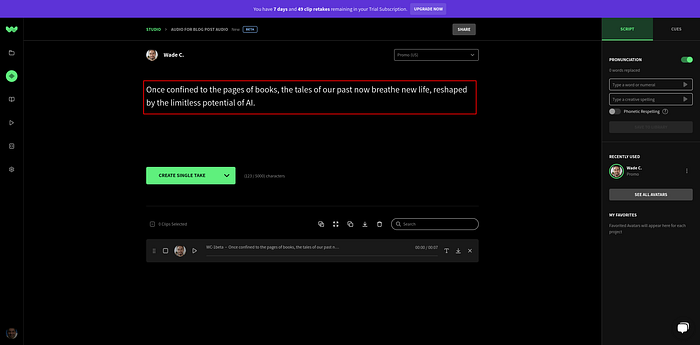
This will give you the audio like this. (Audio)
Step 4: Finish Up
Now that you have all the video clips and associated audio voiceovers, stitch it together using your favorite video editor.
Disclaimer: The author failed Art class and is creatively challenged. Please use your own discretion to improve this process — especially on the creative side and working with the various tools.
Future Work
A nice improvement for this would be to have this entire process automated via API so that a video can be generated 100% from blog post content without human intervention. This is probably a topic for a future post — but will allow scaling out this process massively.

