Figma Design Tokens with Github Repositories
Help keep your design and development consistent

Design tokens are relatively new. You might be asking at this point ‘what is a design token’, and I’m going to lay that out for you. I’m also going to help walk through the creation of a basic token and the process to sync with a Github repository and why we would want to do that.
So let’s get started.
What is a design token?
At this point, many designers have been using a design system. I’ve been using a couple for different projects over the past few years and they’re incredible if you use them correctly.
Some of the issues you might find with newer systems is the change that happens from design to development, and the little things that get left behind in your backlog and don’t get updated. Or perhaps you have multiple platforms all using the same design system, and you’re manually making changes that have been published to the design system in your projects.
A design token is a bit of information stored in a file for your front-end developers which was published in your design tool (in our case today, Figma).
- The designer makes the edit within the design tool, and gets it approved
- Next, the changes get published in your design tool
- The tool now pushes a version to your repo, in the specified language for the target platform
- Your front-end developer pulls the code for implementation
Generally, this could get messy if we’re using the wrong structure to do so. The smart idea here is to use a ‘core’ stylesheet which will contain these tokens. This way when your developer chooses to implement the token updates, they shouldn’t conflict with other sheets in the structure.
OK. That’s fancy. But how?
I’ve been using the Figma Tokens plugin to create my style tokens in Figma. While using this I am able to do some similar things within Figma that you’re already capable of, such as change and publish colors and fonts. But Figma Tokens goes even further and allows for more control for specs such as line-height, letter spacing, opacity, and even gradients.

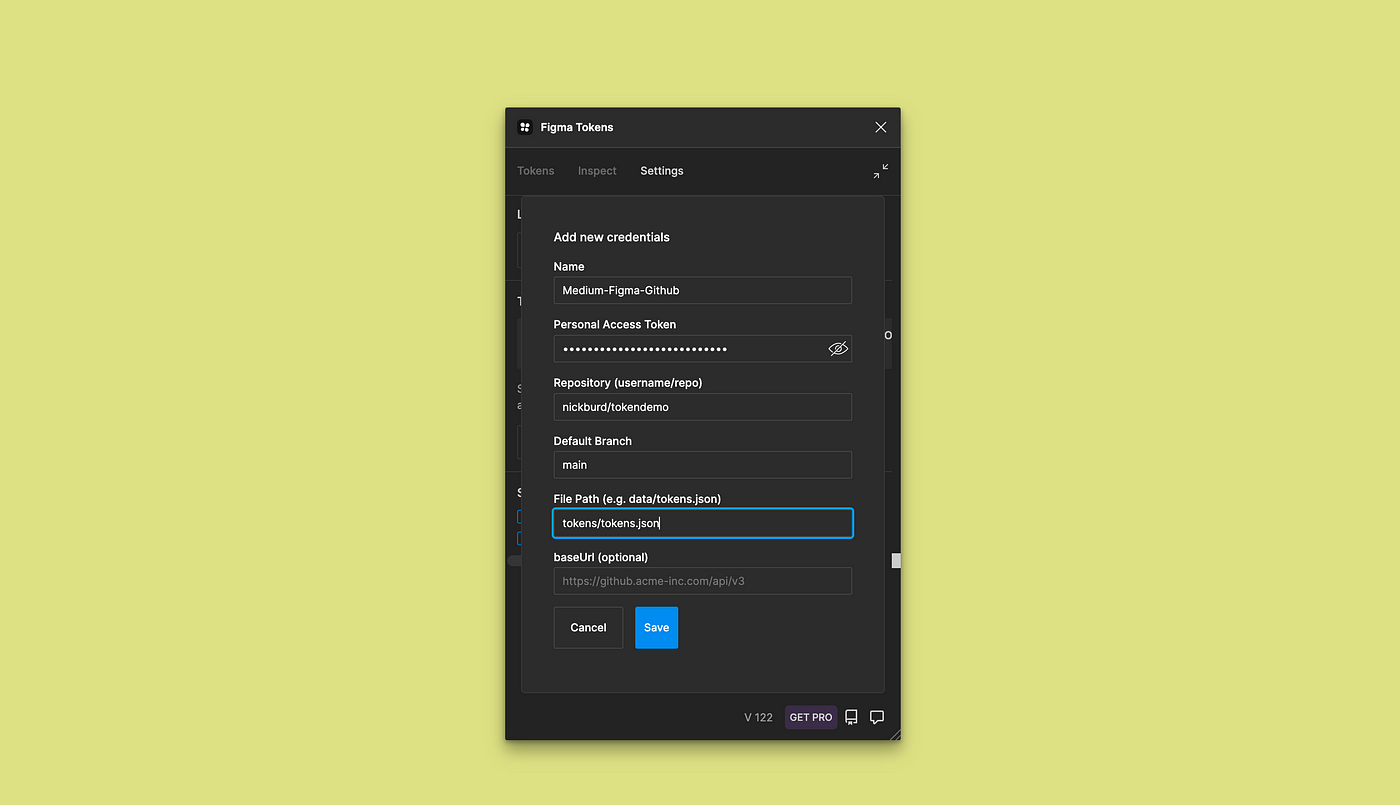
In order to connect these design tokens to your Github, you’ll need to open the plugin in Figma and navigate to the Github credentials in the settings tab.
Doing this you’ll need to provide the plugin with the necessary information such as:
- Name of project
- Personal access token
- Repository username
- Default branch
- File path
- Base URL (optional)
Some items to note in this process are the fact that your personal access token can be created in your Github profile > settings > developer settings > personal access token. In here you generate and name the token with the proper repo access.
Once you’ve created the access token, it is ideal to create your repository or the branch for the project. This choice is dependent on the progress of the project and where you might need this particular token file to be stored.
If you’re starting fresh, it’s ideal to clone your repo at this stage. If you’re familiar, you can create a couple files to support your project. But if you’re strictly a designer, you can rely on your front-end developer to do this.
Next, we can use the credentials and repository information inside the Figma plugin. This will allow us to connect the repository to our design token files.
OK, now I’ve connected Github to Figma. What next?
You’re almost there. It’s a quite simple process and I think that the final stages of this here will be quick and painless.
Once you’ve saved your credentials, you’ll be presented with a dialogue box inside the Figma plugin which will ask you if you’d like to push your tokens to the repository. It will prompt for a message, and further details. This is something that repository users are familiar with, as it’s a commit message which describes the changes. I would certainly suggest making this a brief but meaningful description for the developers who are accessing the repository.
Congratulations. You’ve just successfully published your first round of Figma Design Tokens to a Github repository.
Following steps
After you’ve pushed the design tokens to Github, your developer will be able to access the tokens folder and json file you’ve added. If they simply pull the most recent version, the code will be added to the development files they are using.
For the developers; if they’re not familiar with the process from here, it’s going to require converting the json styles into variables to be used with CSS. You can do this using style dictionary by installing using the npm install which will compile the files when your config.json file is set up in your project (run style-dictionary build in your command line.
I will do a deeper dive on compiling and updating variables using style dictionary. But for now, you’ll have to rely on the documentation in the link above.
Finally…
Once this is all achieved, any changes in Figma that are pushed to the repo can be simply pulled by the developer and automatically updated in the project files site wide.
These changes are all logged and documented in the repository, so if you feel like you need to revert the files — it can be pretty simple to do so. Otherwise, editing and pushing new style variations or changes can be a solution here as well.
I hope this has been a fun project for everyone. If you have used this method before, and have anything to add please do not hesitate to comment!
Did you know if you hold the “clap” button a while, that more people have a chance of seeing this story? — Find me on my Instagram for more content and conversation!

