Creating stunning liquid (gooey) animation in Figma
With this technique, you can easily enhance the visual appeal of your work and create unique and memorable designs.
Get this Figma Community file if you just want to use this effect without any extra hassle:
But if you‘d like to know how it works in detail, let’s continue to the article.
Introduction
I am constantly looking for opportunities to bring more life to my designs. Of course, on one hand, it’s just a medium for quick iterations before actual development, so it doesn’t need to be fully interactive or to represent complete functionality in the prototype. But on the other hand, wouldn’t it be nice to have some ways to impress your clients and create a “wow” effect?
With this in mind I started my exploration, and you can see the result in the cover image of this article. It works without any plugins and was recorded from a Figma prototype directly. Also, it’s fully customizable — color, shape, speed, etc.
So why not just use plugins? Because animations created with plugins work only in design mode and not in prototypes, which isn’t very convenient for sharing with others, especially with customers. While with this approach you can just share your prototypes as usual, but with a bit of a magical touch on them.
Blob: Origins
To be fair, I’m not the one who invented the original technique, it’s been there for ages. Photoshop users might know that this effect can be achieved by applying blur to objects and then adding a Brightness/Contrast filter above with contrast cranked up to the maximum.

Or in After Effects you can also use blur in combination with Simple Choker effect to achieve similar results.
The issue is that modern UI design tools allow you to add blur to objects, but there is no option to apply contrast. And this is where I come in—I found a way to overcome this limitation using blending modes. Because of that, this technique works basically in any design tool—Figma, Sketch, Rive etc. Currently, Figma is the most popular option on the market, so I will demonstrate the technique only in Figma, but it can easily be adapted to your preferred tool.
I call it Dodge & Burn.
Casting the spell ✨
Let’s start with creating some random black circles that work as a base of our shape. I’d want to keep things simple for this tutorial so I add two:

Group them together (Cmd+G/Ctrl+G) and add layer blur to the group. Call it something like ‘Shape’:

You can also use radial gradient instead of blur. Thanks Michael B. Myers Jr. for the awesome tip.
Then draw a large (the size should be a bit bigger than your desired shape) gray (about #808080) rectangle above with a Color dodge blending mode. It works like a low-pass filter for every object below it— cuts out any color that is lighter than the color of the rectangle. You can move the circles around and already see the effect resembing what we are trying to achieve here:

How is it possible? When two blurred edges intersect, their opacity and therefore lightness (or should I say darkness?) sums up, allowing for a low-pass filter to let them through:
The edge is still a bit blurry, so we need a way to ‘solidify’ it. It can be achieved by adding another rectangle on top, but this time it should be pure black with Color burn blending mode applied:
And that’s basically it! As you can see, this approach is extremely simple, yet powerful and provides a great space for creativity. Here are some pro tips to bring your blobs to the next level.
Motion
With the power of Interactive Components and Smart Animate you can create organic motion and many different shapes. Here’s the simple example:
Use these animation parameters to achieve this result:
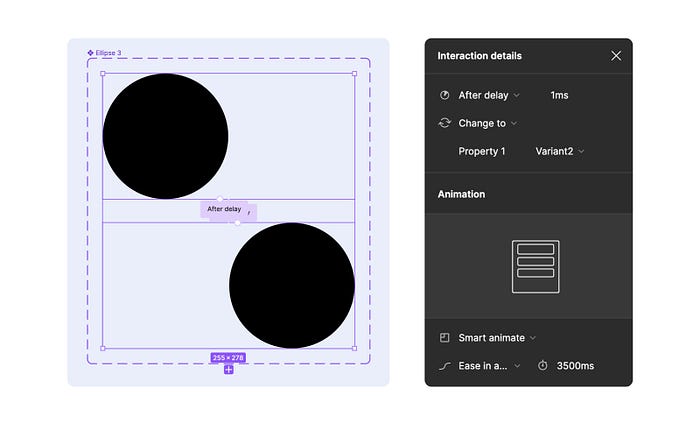
But don’t limit yourself to linear motion only! You can apply rotation, pulsing, jumping… just experiment!
Color
To add a color or gradient you’ll need another rectangle with blending mode set to Screen:
Don’t forget you can animate it as well (add rotation for example)!
Images
Also you can use images instead of color. The process is the same: just use Screen blending mode.

Drawbacks
Unfortunately this technique is not perfect. Blending modes affect not only the shape but the background as well. Because of that any attempts to change its color will lead to this:
But don’t panic! I’ve found a solution that solves the problem, although it’s not ideal too:
This solution, along with other tips (like how to use it on dark background or how to apply dynamic edge blur) are presented in the Community file:
Check it out, I promise it’s worth it!
As a bonus, here’s what’s possible if you go completely nuts with it (yes, it was done in Figma!):
Here’s a couple hints if you’re curious how this works:
- you can change the color of any layer, not only the one named ‘Color’
- use a grid made of instances of this simple component to emulate mouse tracking: