A couple of months ago, amidst yet another resume update, I reached out to my LinkedIn network of designers and recruiters with a burning question:
“Should you design your resume or use a simple ATS template?”
In art school and early in my UX/UI career, showcasing your design skills and personal branding in resumes was the standard. Fast forward to 2024, with ATS and AI screening resumes, the current trend leans more towards simple, pre-formatted templates. There’s even a booming market for buying and selling ATS-friendly resume templates.
Facing conflicting information, I couldn’t help but wonder if this applies to Product Designers as well. Driven by curiosity and the need to navigate today’s market, I started researching. I wasn’t planning to share my findings, but as more designers echoed my questions, I frequently found myself sharing what I had learned.
A mix of Google searches, LinkedIn articles, Instagram reels, blogs, podcasts, recruiter chats, and peer conversations fueled my journey. While I can’t cite sources, I compiled my learnings from endless notes, screenshots, and job search trials.
With fellow designers seeking answers and feedback on their resumes, I want to take this opportunity to share my insights and findings with you all as well.
Here’s the typical resume workflow in 2024:
Step 1: Upload to ATS (Applicant Tracking System) where ATS/AI scans the resume for keywords to match the job description
Step 2: Resume reviewed by a recruiter
Step 3: The hiring manager (could be a designer) reviews the resume
Step 4: Additional team members (mix of designers and non-designers) might get a copy as well

Let’s delve into the first two critical steps of the resume process, where optimization is key:
Step 1: ATS/AI Scan — Your resume’s first hurdle is clearing the ATS filter. I’ll cover how to format your resume to navigate this automated screening more effectively.
Step 2: Recruiter Review — Recruiters, though not themselves designers, play a pivotal role. You only have around 5 seconds to capture their attention and align your resume with their priorities.
Let’s look at different strategies around how you can effectively optimize your resume to get the interview!
1. Software: Adobe InDesign, Illustrator, Figma, Microsoft Word, or Google Docs?
Over my years of experience, I’ve discovered a quirk in software that uses layers — it can change the order in which frames are selected based on the invisible order of layers in an exported PDF. While this might not matter when viewing or printing a PDF, it becomes glaringly apparent when you copy and paste the entire page — your text frames will show up out of order! This issue is especially prevalent in InDesign and can be challenging to rectify. There will also be unnecessary metadata cluttering your file. I’ve found Google Docs to be my go-to option because it has top-to-bottom scanning when exported as a PDF. Microsoft Word offers a similar functionality.
2. Layout: 2 columns vs. single column.
In recent years, most resumes I’ve encountered feature a header across the top containing your name, title, contact information, and links. Your name should be the biggest piece of information on the page, prominently displayed and easy to see at a quick glance. Many design resumes adopt a 2-column layout, with one column focusing on experience and the other on skills, tools, and education. However, this visually appealing layout can pose challenges during scanning.
- How ATS Systems Scan Your Resume: ATS systems lack the visual perception of humans. Exporting your resume as a plain text file (.txt) reveals the way a computer would parse the information — top-to-bottom. With a 2-column design, this can create issues in the order the information is read and processed.
- How Recruiters Scan Your Resume: Recruiters typically spend about 5 seconds initially scanning a resume. Eye-tracking studies reveal a common “F pattern” scanning approach, emphasizing headers, the first paragraph below, and a quick scan down the left side, where bullet points are highly effective in capturing attention.

3. Content and Keywords:
Put critical information like your name, title, contact info, and location at the top. Then add the most important details, such as your summary and/or key accomplishments, as this is the first thing scanned by both ATS and humans. Use this opportunity to include as many relevant keywords from the job description as possible. Utilize an ATS scanner like jobscan.co with the job description to compile a list of keywords that an ATS or AI will prioritize. Ensure you sprinkle these keywords throughout your resume, repeating the most crucial ones to maximize visibility and compatibility with the screening process.
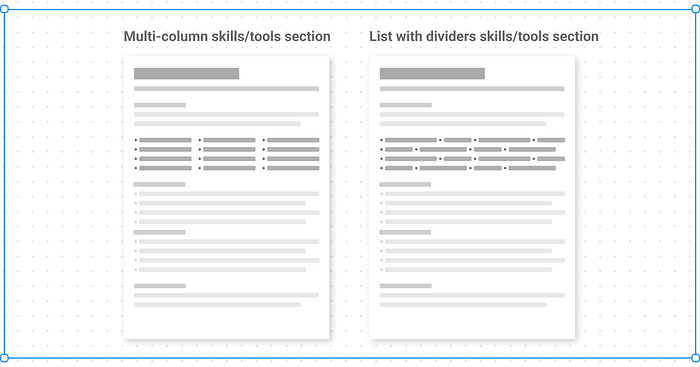
4. Formatting Skills/Tools/Software sections:
Consider the layout of this section carefully, opting for clarity and readability. Some prefer multi-column sections, while others use bullet points or vertical lines to separate items within a list.
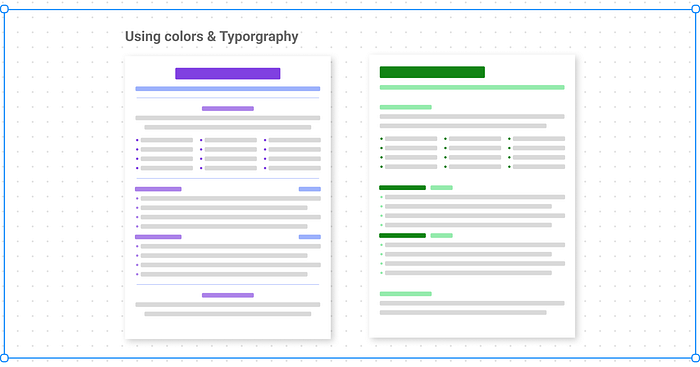
5. Color and Customization:
As designers, aesthetics matter. Create a visual hierarchy within sections, using your brand colors and typography. Opt for ATS-friendly fonts like Arial or Times New Roman and avoid unique glyphs that may not be universally compatible.
ATS Friendly fonts include: Arial, Calibri, Cambria, Garamond, Georgia, Helvetica, Palatino, Times New Roman, Tahoma, and Verdana
6. Formatting your professional summary and bullet points:
Navigating formatting content of your resume content can be confusing, with different advice floating around. Crafting a catchy professional summary follows a formula, similar to a LinkedIn headline:
Adjective +Title + Years of Experience (if less than 2 say “with experience/degree in”) + Specialties (keywords from job description)
Example Professional Summary:
“Creative Mid-Level UX Designer with 5 years of experience in Human-Centered Design, Prototyping, and User Research, specializing in crafting user-centric solutions for web-based consumer-facing platforms in a startup environment.”
Bullet points also follow a formula with measurable results:
Accomplished Z by doing X as measured by Y
Example: “Increased adoption rates by 15% by implementing UX improvements based on user testing, tracked by monthly active users.”
Accomplished Z as measured by Y by doing X
Example: “Increased adoption rates by 15% by tracking monthly active users as a result of implementing UX improvements based on user testing.”
Worked on X resulting in Z
Example: “Implemented UX improvements based on user testing, resulting in a 15% increase in monthly active user adoption rates.”
Once you’ve updated your resume, put it to the test by uploading it to different ATS systems. This helps you see what’s working and what isn’t, allowing for continuous improvement as you learn more.
White text: I have heard many people suggest adding the job description for the role you are applying to in 1-point white text hidden in your resume PDF. When I tried it, I did not see a difference in response rates. If this works for you, leave a comment and let me know.
7. Number of Pages:
Resume length varies based on experience. Aim for a single page for 1–7 years of experience, up to 2 pages for 8–20 years, with a maximum of 3 pages for over 20 years. Be selective about including older experience, and always prioritize relevance.
Resources:
ATS Checker against Job Description: https://www.jobscan.co/
ATS & AI friendly resume builder: https://www.tealhq.com/tools/resume-builder
My list of commonly used ATS systems: greenhouse.io, lever.co, workable.com, smartrecruiters.com, ashbyhq.com, bamboohr.com, rippling-ats.com, breezy.hr, and of course workday.com
LinkedIn Headline Formula: https://www.linkedin.com/pulse/linkedin-headline-formula-label-keywords-interest-sue-ellson/
This is the information I wish I had when I first updated my resume, and I hope you find it helpful!
What other tips and tricks you’ve come across that worked?
Note: This does not encompass giving your resume directly to a recruiter or hiring manager. Some designers I have talked to have a different version for sharing directly with humans.

